Creating a Dev Tool Module for DPG #
Overview #
This is a 2 part series:
- Setting up live code execution in a live DPG program
- Set up a general development UI kit that can be re-used easily for each component and project (You are here)
In the prior tutorial we put together a window that lets us directly run code and interact with a DPG program. Here we take that and expand it into a small but reusable development kit. Full annotated code is available here.
Approach #
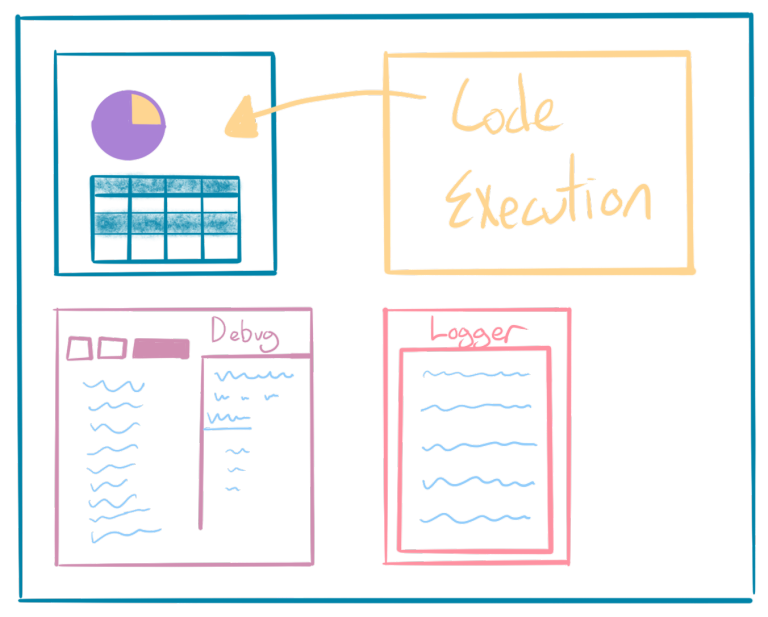
Design
We’re going to keep it simple and small:
- A code input with execution ability
- A logger with convenience methods
- A Debugger Window
This is meant to be modular and easy to hack on so that we can build quick windows and functions without having to build up the basics each time.
Even better this means that every tweak and improvement we add will be available in future projects too!
Code #
The components we need are:
- A logger
- An execution window
- A debug window
Let’s Define Our Class:
import dearpygui.core as c
import dearpygui.simple as s

class DevKit:
    def __init__(
            self,
            logger: str = "",
        ):
            self.logger = logger
    def init_windows(self):
        """
        Creates and arranges our windows
        """
        c.set_main_window_size(1000, 850)
        c.set_main_window_pos(x=280, y=0)

    def run(self):
        """
        Simple run method
        """
        self.init_windows()
        c.start_dearpygui()

dev = DevKit("An Example Logger")
if __name__ == "__main__":
    dev.run()
Dev Kit Class
Here we do these steps:
- Define our
__init__method- the
loggervar will define the logger name
- the
- Create an
init_windowsmethod- This creates all windows and updates main window params
- Create a
runmethod- I tend to make run be a simple initialize all windows and start DPG
This is how I structure all my UI components in DPG:
__init__with any state variables that I want to consistently trackinit_windowsto create all defined windows in the componentrunmethod that allows running just that component solo
In general this seems to work pretty well and I follow this pattern frequently.
Importing dearpygui and star imports
Importing via
from dearpygui.core import *or any modules generally is discouraged.For example let’s pretend dearpygui.core added a new function
def print(val):
    return str(val).upper()
Then on import any time you called
print('some value')instead of it going to your console it’ll call the print function you accidentally imported.By doing
import dearpygui.core as cyou don’t overwrite the default print function and can still access it by callingc.print.I also find it much easier to track where things come from.
Okay that’s super basic, let’s add a logger window!
Creating Logger Window #
Here we define window configuration. You can do a s.show_logger() but by defining our own window we gain a few advantages:
- We can give the logger its own name
- This lets us set up multiple logger windows that don’t collide
- We can control positioning and size
I like to define specific window creation functions as ‘private’ (remember that there are no truly private functions in python!) because it’s semi-rare to call these methods directly. They are mostly chained into an overall init_windows method.
This helps autocomplete when we call other log methods.
Code
def _logger_window(self):
    """
    Creating our logger window
    """
    window_name = (
        self.logger.replace("_", " ").title()
        + "##window"
    )
    with s.window(
        name=window_name,
        width=500,
        height=500,
        x_pos=500,
        y_pos=350,
        no_scrollbar=True,
    ):
        c.add_logger(
            name=self.logger,
            autosize_x=True,
            autosize_y=True,
        )

def init_windows(self):
    """
    Creates and arranges our windows
    """
    self._logger_window()
    c.set_main_window_size(1000, 850)
    c.set_main_window_pos(x=280, y=0)
Expected Output
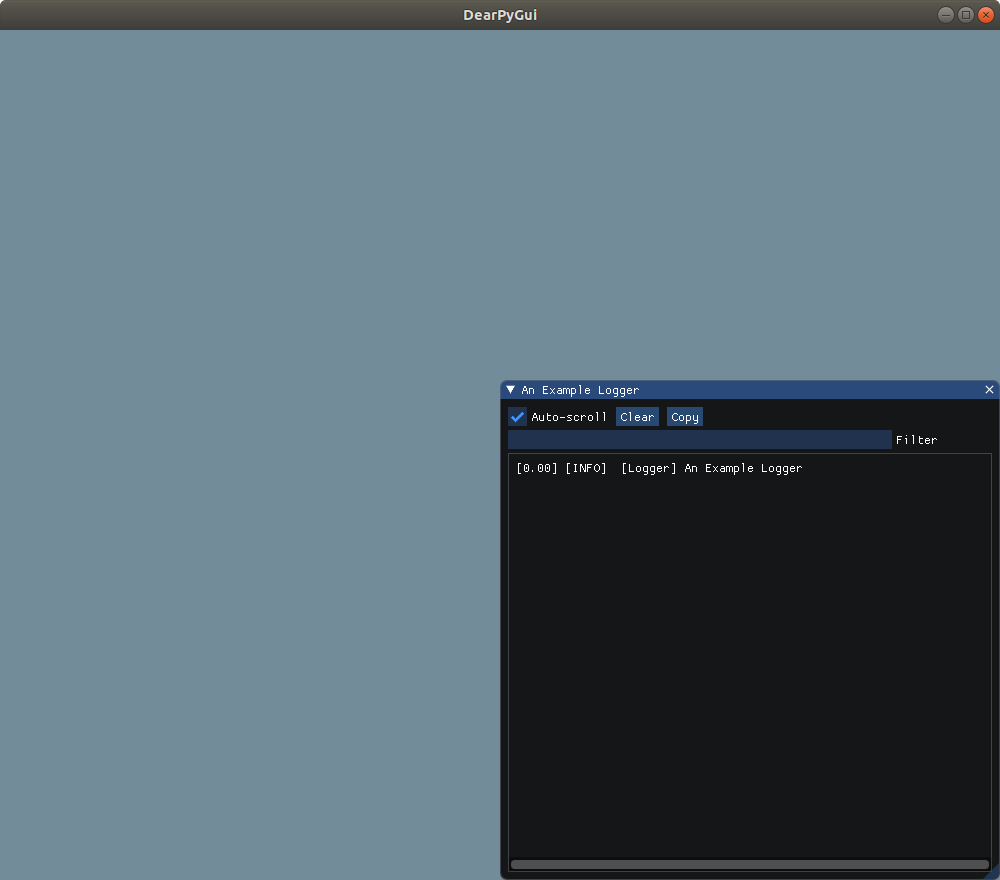
Note how the x_pos and y_pos kwargs lets us push this in the corner.
Adding logger helper methods #
Because we stored the logger name in our self.logger variable, this makes it very easy for us to ensure our logs are getting to the right place. Here we are going to define some basic helper functions and then we’ll do some advanced python wizardry using decorators.
Code
def log(self, message):
    """
    Convenience method because log_info
    is just too many letters to type.
    """
    self.log_info(message=message)

def log_info(self, message):
    """
    Logs at info level
    """
    c.log_info(message=message, logger=self.logger)

def log_debug(self, message):
    """
    Logs at debug level
    """
    c.log_debug(message=message, logger=self.logger)

def log_warning(self, message):
    """
    Logs at warning level
    """
    c.log_warning(
        message=message, logger=self.logger
    )

def log_error(self, message):
    """
    Logs at error level
    """
    c.log_error(message=message, logger=self.logger)
Expected Output
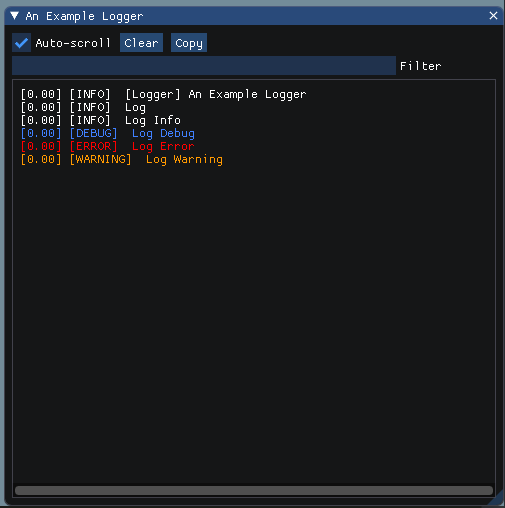
If you want to see each of these examples, change run to look like this:
def run(self):
    """
    Simple run method
    """
    self.init_windows()
    self.log("Log")
    self.log_info("Log Info")
    self.log_debug("Log Debug")
    self.log_error("Log Error")
    self.log_warning("Log Warning")
    c.start_dearpygui()
More Advanced Logger Helpers - Decorators #
Okay those are pretty basic, let’s make a few advanced decorators to make our lives easier.
Code
import functools #top of file

def log_return(self, func):
    """
    An external decorator for dumping a function
    return value into the logger.
    """

    @functools.wraps(func)
    def wrap(*args, **kwargs):
        result = func(*args, **kwargs)
        self.log_info(
            f"{func.__name__} return value:"
        )
        self.log_info(result)
        self.log_info("-" * 20)
        return result

    return wrap

def log_all(self, func):
    """
    A decorator for dumping a function's
    arguments and result into a logger
    """

    @functools.wraps(func)
    def wrap(*args, **kwargs):
        name = func.__name__

        # Logging Arguments
        self.log_info(f"{name} Arguments:")
        for argument in args:
            self.log(f"\t{argument}")

        # Logging kwargs if exist
        if len(kwargs) > 0:
            self.log(f"{name} Key Word Arguments:")
            for key, value in kwargs.items():
                self.log(f"\t {key} : {value}")

        # Logging Return Value
        result = func(*args, **kwargs)
        self.log(f"{name} Return Value:")
        self.log(f"\t{result}")
        self.log("-" * 20)
        return result

    return wrap
Explanation
Decorators are a bit complex but they basically allow for you to modify functions externally instead of re-writing them.
These are called via @log_return or @log_all like so:
#Add this under the if __name__ == "__main__":
@dev.log_return
def external_log_example():
    """
    You should be able to see the same value in
    console and in the logger.
    """
    import random

    random_number = random.randint(0, 10)
    print(random_number)
    return random_number
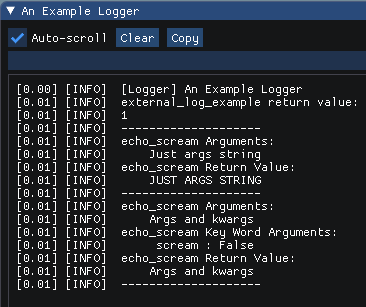
Here’s what’s happening - our function external_log_example is being wrapped so the name of the function, it’s return value, and a horizontal line is logged before the random_number variable is returned.
And for @log_all
#Add this under the if __name__ == "__main__":
@dev.log_all
def echo_scream(string_to_echo, scream=True):
    """
    An example function to show args/Kwargs
    """
    if scream is True:
        string_to_echo = string_to_echo.upper()
    print(string_to_echo)
    return string_to_echo
This will log all the args, kwargs, and return result into the logger.
Expected Output
Adding Execution Window #
For a more in-depth dive, check out the previous write-up.
Code
@property
def command(self) -> str:
    """
    A simple property to make fetching command
    input way easier.
    :return: String of command to exec
    """
    return c.get_value("command##input")

def execute(self, *_args):
    """
    Executes arbitrary command input in running program
    :param _args: This catches sender and data arguments
        that we aren't using here
    :return: None, executes command
    """
    exec(self.command)

def _command_window(self, exec_command=None):
    """
    Creates execution window with execute callback
    """
    callback = (
        self.execute
        if exec_command is None
        else exec_command
    )
    with s.window(
        name="command##window",
        autosize=True,
        x_pos=485,
        y_pos=0,
    ):
        c.add_input_text(
            name="command##input",
            width=500,
            height=300,
            multiline=True,
            on_enter=True,
            callback=callback,
        )
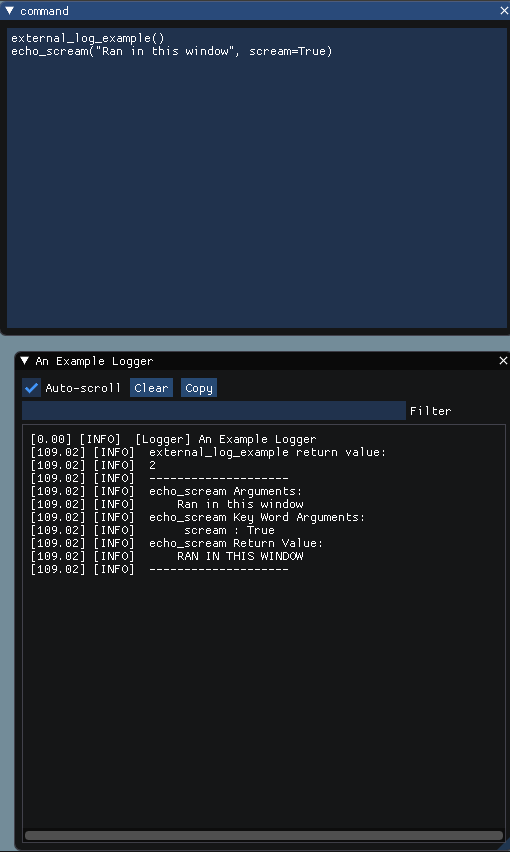
Expected Output
In adding the _command_window and running
external_log_example()
echo_scream("Ran in this window", scream=True)
will return:
If you don’t see the command window, make sure to add self._command_window() to your init_windows method!
What’s this exec_command argument in _command_window?
#
As you can see by default we have our execute function created as part of our DevKit class. But we only use that internal execute function when we don’t pass in another one explicitly (the exec_command kwarg).
This is so we can put in other execute commands that are defined in different scopes. Here we have access to the class instance dev and the functions defined after it in the if __name__ == '__main__' section. So we can run commands like self.log('foo') or echo_scream("foo").
In the next major section A More Complex Example we show the differences between setting an execute command in the component class scope versus module level scope. Each have their pros and cons.
To make it easier to setup, we’re going to do a minor update to init_windows to include that as a kwarg:
def init_windows(self, external_exec_command=None):
    """
    Creates and arranges our windows for the kit
    """
    self._logger_window()
    self._command_window(
        exec_command=external_exec_command
    )
    c.set_main_window_size(1000, 850)
    c.set_main_window_pos(x=280, y=0)
Now if we call dev.init_windows() it has the internal execution command or we can feed in an external one and it’ll pass it to our command window. Let’s look at how to do that:
Setting an external exec_command #
We can access the text in the command window via the command property we defined above. Typically this means calling dev.command which is equivalent to calling c.get_value('command##input'). Quite handy!
A minimal execute command can be as simple as:
dev = DevKit()
execute = lambda *args: exec(dev.command)
dev.init_windows(external_exec_command=execute)
We give it *args for catching the sender and data arguments that are automatically sent via callbacks.
If you are placing this in a class-based component and want access to self then use:
class ExampleComponent:
    execute = lambda self, *args: exec(dev.command)

    def __init__(self):
        pass
This allows access to the internal instance (self) in the command window while also catching the sender/data arguments.
Adding The Debug Window #
We’ve done the hard work, this part is suepr easy! So easy I totally spaced on adding it until I wrote half of this. Whoops!.
We update our init_windows function and add the debugger window:
Code:
def init_windows(self, external_exec_command=None):
    """
    Creates and arranges our windows for the kit
    """
    self._logger_window()
    self._command_window(
        exec_command=external_exec_command
    )
    c.add_debug_window(
        "Debugger", x_pos=0, y_pos=350, width=500
    )
    c.end()
    c.set_main_window_size(1000, 850)
    c.set_main_window_pos(x=280, y=0)
Expected Output:
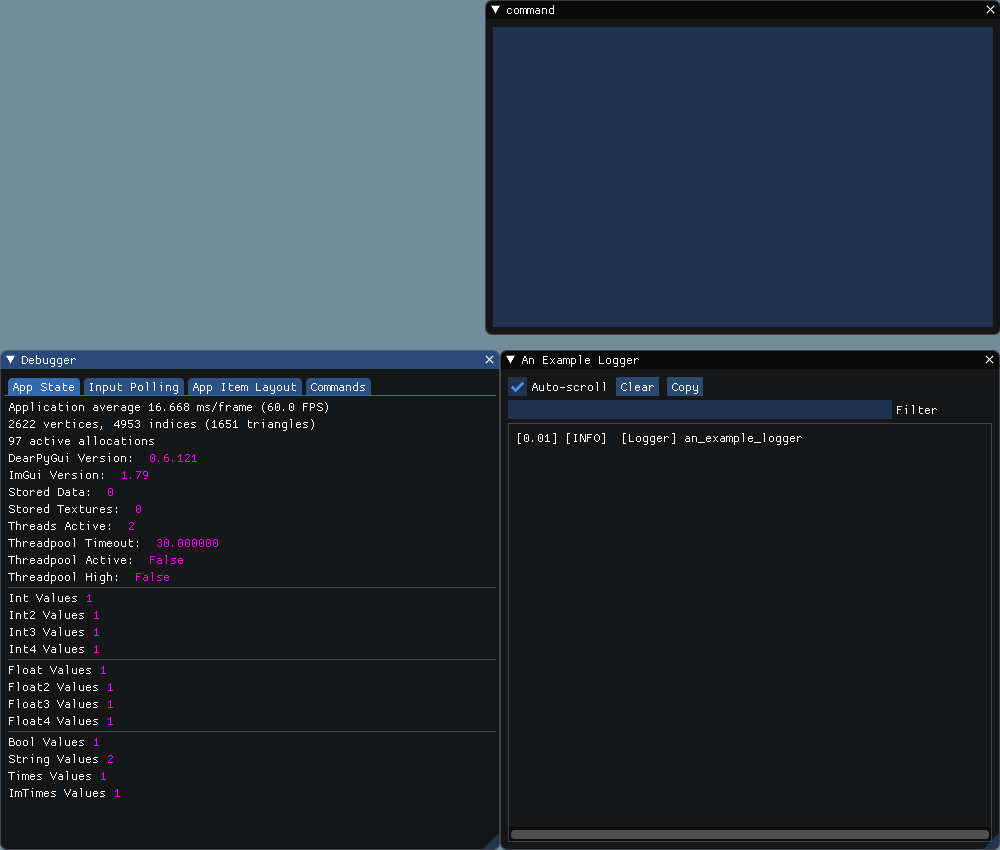
Here because we don’t do anything special with it beyond moving and trimming the width a bit, I don’t create a _debug_window method.
For anything that is more than two lines or has any related data-processing methods, I highly recommend pulling the code constructing that element into its own methods. I find it makes it much easier to maintain and edit generally.
Full DevKit Code - Annotated #
Full DevKit Code
"""
The code examples for :
https://www.isuckatcoding,net/docs/development_module/
"""
import functools

import dearpygui.core as c
import dearpygui.simple as s


class DevKit:
    def __init__(
        self,
        logger: str = "",
    ):
        self.logger = logger

    def log_return(self, func):
        """
        An external decorator for dumping a function
        return value into the logger.
        """

        @functools.wraps(func)
        def wrap(*args, **kwargs):
            result = func(*args, **kwargs)
            self.log_info(
                f"{func.__name__} return value:"
            )
            self.log_info(result)
            self.log_info("-" * 20)
            return result

        return wrap

    def log_all(self, func):
        """
        A decorator for dumping a function's
        arguments and result into a logger
        """

        @functools.wraps(func)
        def wrap(*args, **kwargs):
            name = func.__name__

            # Logging Arguments
            self.log_info(f"{name} Arguments:")
            for argument in args:
                self.log(f"\t{argument}")

            # Logging kwargs if exist
            if len(kwargs) > 0:
                self.log(f"{name} Key Word Arguments:")
                for key, value in kwargs.items():
                    self.log(f"\t {key} : {value}")

            # Logging Return Value
            result = func(*args, **kwargs)
            self.log(f"{name} Return Value:")
            self.log(f"\t{result}")
            self.log("-" * 20)
            return result

        return wrap

    def init_windows(self, external_exec_command=None):
        """
        Creates and arranges our windows for the kit
        """
        self._logger_window()
        self._command_window(
            exec_command=external_exec_command
        )
        c.add_debug_window(
            "Debugger", x_pos=0, y_pos=350, width=500
        )
        c.end()
        c.set_main_window_size(1000, 850)
        c.set_main_window_pos(x=280, y=0)

    @property
    def command(self) -> str:
        """
        A simple property to make fetching command
        input way easier.
        :return: String of command to exec
        """
        return c.get_value("command##input")

    def execute(self, *_args):
        """
        Executes arbitrary command input in running program
        :param _args: This catches sender and data arguments
         that we aren't using here
        :return: None, executes command
        """
        exec(self.command)

    def _command_window(self, exec_command=None):
        """
        Creates execution window with execute callback
        """
        callback = (
            self.execute
            if exec_command is None
            else exec_command
        )
        with s.window(
            name="command##window",
            autosize=True,
            x_pos=485,
            y_pos=0,
        ):
            c.add_input_text(
                name="command##input",
                width=500,
                height=300,
                multiline=True,
                on_enter=True,
                callback=callback,
            )

    def _logger_window(self):
        """
        Creating our logger window
        """
        window_name = (
            self.logger.replace("_", " ").title()
            + "##window"
        )
        with s.window(
            name=window_name,
            width=500,
            height=500,
            x_pos=500,
            y_pos=350,
            no_scrollbar=True,
        ):
            c.add_logger(
                name=self.logger,
                autosize_x=True,
                autosize_y=True,
            )

    def log(self, message):
        """
        Convenience method because log_info
        is just too many letters to type.
        """
        self.log_info(message=message)

    def log_info(self, message):
        """
        Logs at info level
        """
        c.log_info(message=message, logger=self.logger)

    def log_debug(self, message):
        """
        Logs at debug level
        """
        c.log_debug(message=message, logger=self.logger)

    def log_warning(self, message):
        """
        Logs at warning level
        """
        c.log_warning(
            message=message, logger=self.logger
        )

    def log_error(self, message):
        """
        Logs at error level
        """
        c.log_error(message=message, logger=self.logger)

    def run(self, external_exec_command=None):
        """
        Simple run method
        """
        self.init_windows(
            external_exec_command=external_exec_command
        )
        c.start_dearpygui()


dev = DevKit("an_example_logger")
if __name__ == "__main__":

    @dev.log_return
    def external_log_example():
        """
        This picks a random number, prints it in console
        and returns the picked value.

        You should be able to see the same value in
        console and in the logger.
        """
        import random

        random_number = random.randint(0, 10)
        print(random_number)
        return random_number

    @dev.log_all
    def echo_scream(string_to_echo, scream=True):
        """
        An example function to show args/Kwargs
        :param string_to_echo: string to echo back
        :param scream: if True run .upper() on string
        :return: string echoed response
        """
        if scream is True:
            string_to_echo = string_to_echo.upper()
        print(string_to_echo)
        return string_to_echo

    external_log_example()
    echo_scream("Just args string")
    echo_scream("Args and kwargs", scream=False)
    dev.run()
A More Complex Example #
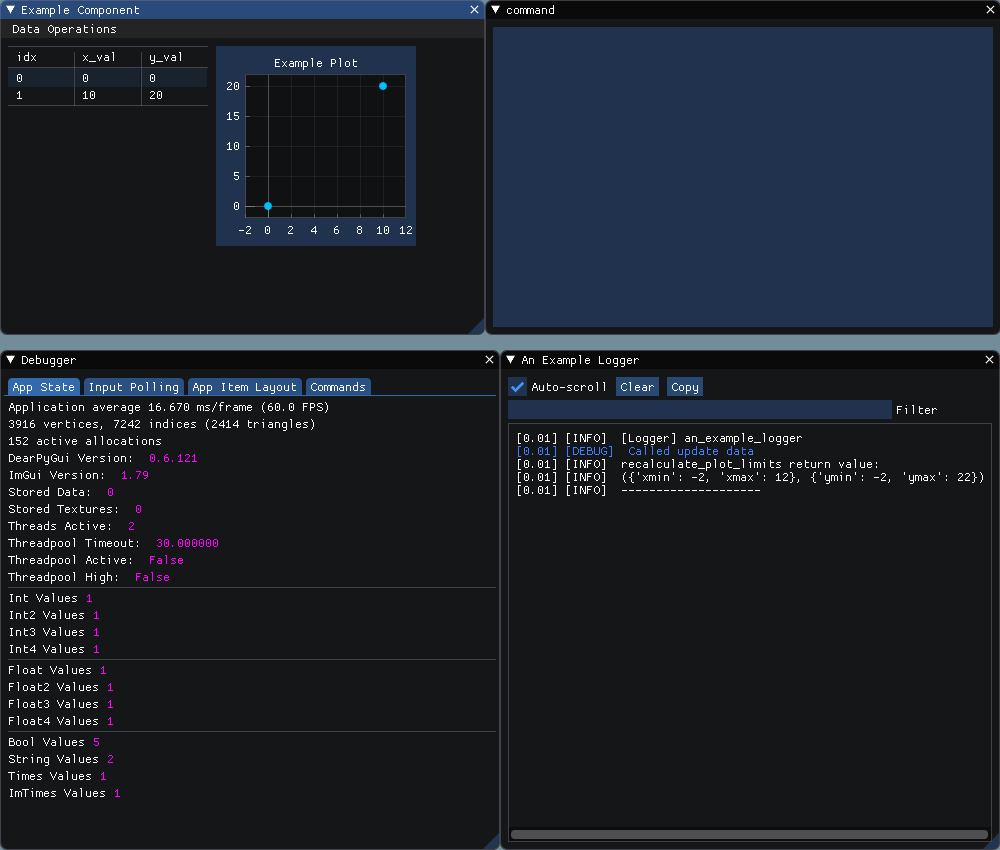
Here we show a more complex example applied to a component called ExampleComponent that has a table of x/y data, menus, user data input, and a scatter plot with built-in padding.
Quick Overview of Component #
There is a lot here but it’s generally pretty straight-forward. Full code is available at the end of the page.
This defines the following pieces:
- A window called “Example Component”
- A menu with two options
- One option creates a new window and adds a row to the table
- One option resets the data to a default state
reset_datashowcases the@dev.log_alldecorator
- A table
- A plot with a scatter series
recalculate_plot_limitsis used to showcase the@dev.log_returndecorator
If you run this component with the dev kit, you should see the above image and when you add a row or reset data you will see the functions log when they are called.
Few notes:
In the update_data function it has a dev.log_debug("Called update data") as a manual log. This isn’t a great use of the logging function but generally this is useful for adding flags during specific steps of your functions or logging the state of a variable as a given time.
Let’s Talk Scope #
If we look at the code under our __main__ statement:
ex = ExampleComponent()

INTERNAL_SCOPE = True
if INTERNAL_SCOPE is True:
    """
    Here we set the execution command
    to be the internal execute command
    we defined in ExampleComponent.

    We can execute commands using self
    instead of ex
    """
    dev.init_windows(external_exec_command=ex.execute)
else:
    """
    if we set the execution command here
    we could access the ExampleComponent
    as the ex variable instead of as self.
    Good for multi-component debugging
    """
    execute = lambda *args: exec(dev.command)
    dev.init_windows(external_exec_command=execute)

ex.run()
You can quickly test with this by flipping the INTERNAL_SCOPE bool to see how it affects your command window.
Scope can be a very complex subject. I highly recommend Fluent Python as an excellent resource for more advanced topics in python like scope and decorators.
Internal Scope
When this is true, we can directly manipulate the ExampleComponent using self. This is because the external_exec_command is defined as a class attribute. Note that we define this as a class attribute and not an instance attribute (a variable defined in __init__) which has some specific implications we won’t talk about until a later write-up.
You can call self.add_data_option("sender", "data") and you will see the input window launch as if you clicked the menu option.
External Scope
With this our execution command is outside the ExampleComponent so we can manipulate it from the variable we assign it to (ex here).
So we can call ex.add_data_option('sender', 'data') and you’ll get the same result as before.
Now if we just did
ex = ExampleComponent()
dev.init_windows()
ex.run()
The loggers still work just fine but now you only have access to the DevKit class (so logging functions) and pretty much most DPG commands.
If you are mostly adjusting and debugging DPG code and not debugging your internal python code.
For example we cannot run ex.add_data_option or self.add_data_option but we can do self.log(c.get_windows()) and it’ll give us all the window names as we expect.
Pro-tip
You should totally write exit() into your command console.
Example Component Full Code #
Example Component Full Code
"""
Shows using the dev kit on class-based GUI components
"""
import dearpygui.core as c
import dearpygui.simple as s
from development_tool_kit import dev
# Note we are importing dev which
# is just DevKit("An Example Logger")!

class ExampleComponent:
    """
    An example component to debug a table + graph
    """

    """
    We set this here so that the execute scope
    has full access to the ExampleComponent state
    and methods.
    """
    execute = lambda self, *args: exec(dev.command)

    def __init__(self):
        self.table_data = [[0, 0, 0], [1, 10, 20]]
        self.labels = ["idx", "x_val", "y_val"]
        self._table_name = "Example Table"
        self._plot_name = "Example Plot"

    @property
    def x_values(self):
        """
        Simple helper to extract x values from data
        :return: list of x values
        """
        return [val[1] for val in self.table_data]

    @property
    def y_values(self):
        """
        Simple helper to extract y values from data
        :return: list of y values
        """
        return [val[-1] for val in self.table_data]

    @dev.log_return
    def recalculate_plot_limits(self):
        """
        A simple method to recalculate plot limits
        with a padding of largest value //10
        :return: x_lim kwargs and y_lim kwargs as dicts
        """
        x_min = min(self.x_values)
        x_max = max(self.x_values)
        y_min = min(self.y_values)
        y_max = max(self.y_values)

        padding = max(
            [
                x_min // 10,
                x_max // 10,
                y_min // 10,
                y_max // 10,
            ],
            key=lambda val: abs(val),
        )

        x_limits = {
            "xmin": x_min - padding,
            "xmax": x_max + padding,
        }
        y_limits = {
            "ymin": y_min - padding,
            "ymax": y_max + padding,
        }
        # We return this to showcase the @dev.log_return decorator
        # It would likely be smarter to have the limits set in here
        return x_limits, y_limits

    def update_data(self):
        """
        Updates data in table and plot
        """
        dev.log_debug("Called update data")
        # Setting table data
        c.set_table_data(
            self._table_name, data=self.table_data
        )

        # Clearing plot and setting new scatter plot
        c.clear_plot(self._plot_name)
        c.add_scatter_series(
            self._plot_name,
            name="Example Scatter",
            x=self.x_values,
            y=self.y_values,
        )
        # Updating plot limits
        x_lim, y_lim = self.recalculate_plot_limits()
        c.set_plot_xlimits(self._plot_name, **x_lim)
        c.set_plot_ylimits(self._plot_name, **y_lim)

    def add_data_option(self, sender, data):
        """
        Creates the data input window for the add data window
        """

        with s.window(
            "Add Data Window",
            autosize=True,
            x_pos=0,
            y_pos=350,
        ):
            # Title text
            c.add_text("Add a new data row:")
            c.add_text(
                name=f"Idx: \t{len(self.table_data)}",
                tip="This is created automatically",
            )
            # Text divider
            c.add_text("-" * 30)
            # input sliders
            c.add_slider_int(name=": x_val")
            c.add_slider_int(name=": y_val")

            # Action buttons
            c.add_button(
                "Cancel",
                callback=lambda *args: c.delete_item(
                    "Add Data Window"
                ),
            )
            c.add_same_line()
            c.add_button(
                "Add Row", callback=self.save_new_row
            )

    def save_new_row(self, sender, data):
        """
        Appends data from Add Data Window to table data
        and closes window
        """
        dev.log_debug("Adding new row -")
        self.table_data.append(
            [
                len(self.table_data),
                c.get_value(": x_val"),
                c.get_value(": y_val"),
            ]
        )
        self.update_data()
        c.delete_item("Add Data Window")

    @dev.log_all
    def reset_data(self, sender, data):
        """
        Resets table data to default values
        """
        dev.log_debug("Reset Called!")
        self.table_data = [[0, 0, 0], [1, 10, 20]]
        self.update_data()

    def _create_menu(self):
        """
        Creates menu with add and reset data options
        """
        with s.menu_bar("MenuBar"):
            with s.menu("Data Operations"):
                c.add_menu_item(
                    "Add Data",
                    callback=self.add_data_option,
                )

                c.add_menu_item(
                    "Reset Data",
                    callback=self.reset_data,
                )

    def create_component(self):
        """
        Creates window with structure for component.
        Used when combining with multiple components
        before running c.start_dearpygui()
        """
        with s.window(
            "Example Component",
            width=485,
            height=335,
            x_pos=0,
            y_pos=0,
        ):
            self._create_menu()
            c.add_table(
                self._table_name,
                headers=self.labels,
                width=200,
            )
            c.add_same_line()
            c.add_plot(
                self._plot_name,
                width=200,
                height=200,
                no_legend=True,
            )
            self.update_data()

    def run(self):
        """
        Creates component and starts DearPyGui.
        """

        self.create_component()
        c.start_dearpygui()


if __name__ == "__main__":
    INTERNAL_SCOPE = True

    ex = ExampleComponent()

    if INTERNAL_SCOPE is True:
        """
        Here we set the execution command to be the
        internal execute command we defined in
        ExampleComponent.

        We can execute commands using self instead of ex
        """

        dev.init_windows(
            external_exec_command=ex.execute
        )
    else:
        """
        if we set the execution command here we could access
        the ExampleComponent as the ex variable instead of
        as self. Good for multi-component debugging
        """
        execute = lambda *args: exec(dev.command)
        dev.init_windows(external_exec_command=execute)

    ex.run()
Conclusion and Wrap-up #
I know this has been a long one, you’re almost done! The biggest thing I’d emphasize is that this is something I built up over a few weeks and for the more complicated pieces like the decorators I spent a while reading and testing things until I got it working.
Try not to feel overwhelmed, you don’t need to build this in one go. This is so if you ever build a tool to solve some problem and run into it again you have it immediately available. And because it’s reusable it means that instead of hacking together some quick tool to just get the job done you can spend a little time polishing the one you have and next time it’s even better than before!
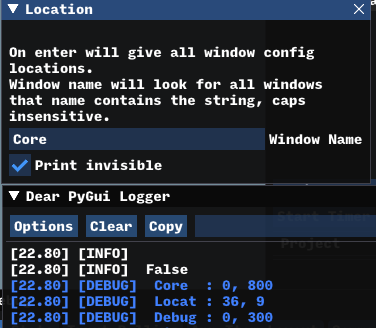
For example I made this quick thing to dump window locations into the logger.
If I ever need this again, I can just add it into the DevKit and it’s ready to go. Instead of spending 10 minutes rebuilding this, I can just focus on the actual issue or spend that time improving what is already there.
A random tool I made
Remember the goal here is to empower you to solve the problems you care about faster and make your life easier! Beg, borrow, and steal what furthers that goal and ignore the rest. Good luck!