Making a Live Dev Environment in DPG #
Overview #
This is a 2 part series:
- Setting up live code execution in a live DPG program (You are here)
- Set up a general development UI kit that can be re-used easily for each component and project
Here we’re going to set up a development environment that will allow dynamically execute code on the fly while your program is running. The biggest perk is that you can execute multiple commands on the fly to quickly test and iterate on your ideas without having to reload your program quite as frequently.
We will do this like this:
- Simple Example
- The idea
- The code
- Security and the
execfunction
- A more complex example based on where I used this in another project
- Steps to apply this to a real project
- Example code that can be executed and played with live
Feel free to skip the more complex example if it doesn’t look helpful, everything critical is shown here.
Live Code Execution #
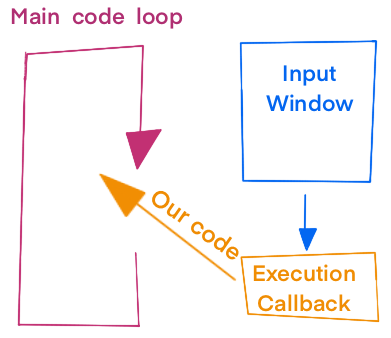
The method and approach is very simple: we create a window with a text input that has a callback function that runs exec on the text input value.
Approach
- We create an input window
- The execution callback injects our code into the live program
Approach Diagram
Code #
import dearpygui.core as c
import dearpygui.simple as s


def execute(*_args):
    """
    Executes arbitrary command input in running program
    :param _args: This catches sender and data arguments
                  that we aren't using here
    :return: None, executes command
    """
    command = c.get_value("command##input")
    exec(command)


with s.window(
    name="command##window",
    autosize=True,
    x_pos=0,
    y_pos=0,
):
    c.add_input_text(
        name="command##input",
        width=500,
        height=300,
        multiline=True,
        on_enter=True,
        callback=execute,
    )

c.start_dearpygui()
Expected Result:
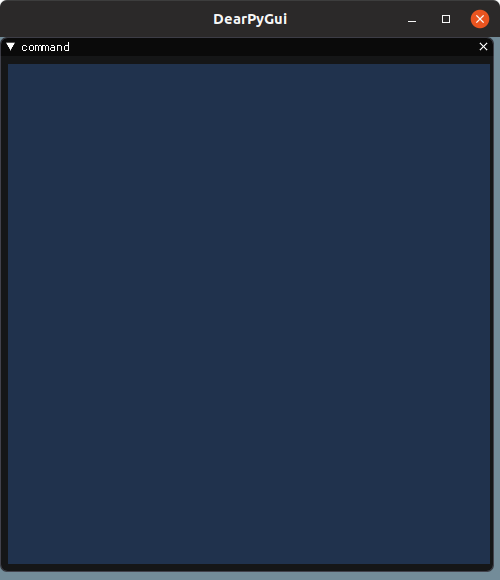
Okay big deal, we created a window with a text input.
But the cool thing is that you can type in any python and it’ll execute live!
on_enterquirkWhen using
multiline=Trueon_enter=Truetriggers onctrl+enterwhereenteradds a new line!
Example code to execute:
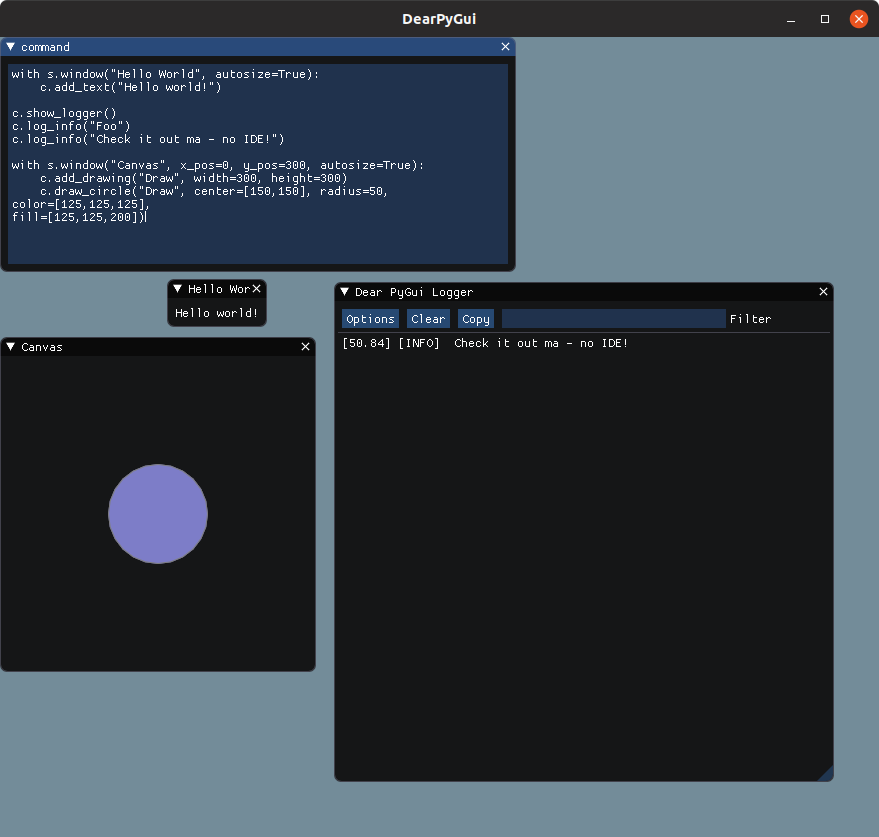
Here is basic code to run in your command window
with s.window("Hello World", autosize=True):
    c.add_text("Hello world!")

c.show_logger()
c.log_info("Foo")
c.log_info("Check it out ma - no IDE!")

with s.window(
    "Canvas", x_pos=0, y_pos=300, autosize=True
):
    c.add_drawing("Draw", width=300, height=300)
    c.draw_circle(
        "Draw",
        center=[150, 150],
        radius=50,
        color=[125, 125, 125],
        fill=[125, 125, 200],
    )
Expected Result (Approximately):
Security Considerations #
exec as a security risk
execis powerful but it’s power also lends it to be a huge security hole! It tries to execute any string passed into it without any validation or protection. Executing python code from un-trusted input like this is dangerous AF.For development and personal projects it’s not a big deal but for any real apps with potential malicious actors, this is incredibly dangerous.
Imagine your mean co-worker walking up to your laptop and writing
from pathlib import Path
# DON'T RUN THIS
for file in Path('/').glob('**/*'):
    if file.is_file():
        print(f"{file} is deleted")
        # file.unlink()
Okay I commented out the actual command here (in case you ran it out of curiosity) but this is basically python’s version of ‘delete System32’ and would quickly fuck over your computer.
We can mitigate this risk by isolating our development tools into a developer module so that in production they cannot be invoked. We work on this in part 2.
Funny story - when committing these examples to github pylint auto-flagged exec as a problem.
A More Complex Example #
We have a project involving making an old-school digital clock style display and we’re we’re trying to get it to render numbers that look like:
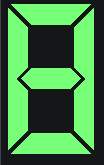
We have created a ‘Number’ class and created a method called draw_item that lets us draw the shape on the canvas in the proper orientation but now that we can draw the shapes, we use the methods from above to play with this code and find coordinates to draw an 8.
The full code is annotated here, you can pretty much run it as is and it’ll put you into a live console that you can start playing with the display.
Code-Style
I tend to use classes and object-oriented programming methods. You can use whatever style suites you. I mostly use classes as a way to bundle all the methods and state together but you can replace the attributes in
__init__withc.set_data/c.get_datacalls and tear out the self from all function definitions.
Approach
As above we add an execute callback and create a text input attached to that.
This has a few perks:
- We can directly interact with the component state
- We can leverage prior code to speed up development
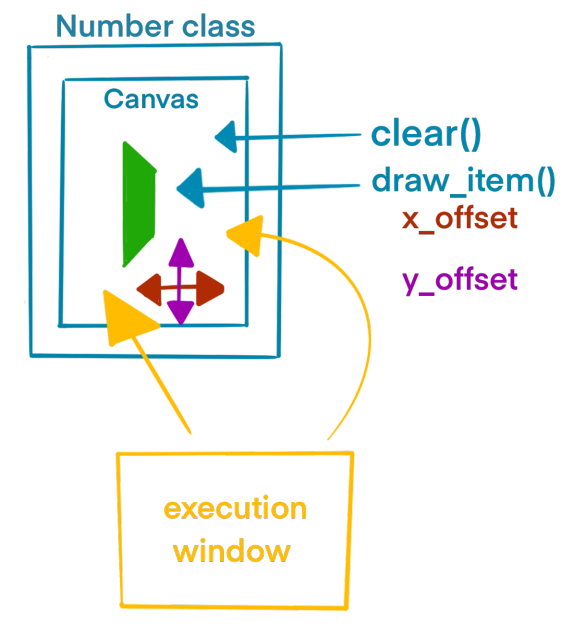
Here we will utilize the methods:
self.clear()to clear the canvas between commandsself.draw_item()to draw our lines quicklyx_offsetto shift line along x-axis (red)y_offsetto shift line along y-axis (purple)
Approach Diagram
Step 1 - Update Run Method
#
Updated Run Method
def run(self):
    window_args = dict(
        autosize=False,
        height=200,
        width=200,
        x_pos=0,
        y_pos=0,
    )
    with s.window("Drawing", **window_args):
        c.add_drawing(
            self.name,
            width=90,
            height=150,
        )

    with s.window(
        "command##window",
        autosize=True,
        y_pos=200,
        x_pos=0,
    ):
        c.add_input_text(
            name="command##input",
            width=600,
            height=300,
            multiline=True,
            on_enter=True,
            callback=self.execute,
        )

    c.start_dearpygui()
Prior Run Method
def run(self):
    window_args = dict(
        autosize=False,
        height=200,
        width=200,
        x_pos=0,
        y_pos=0,
    )
    with s.window("Drawing", **window_args):
        c.add_drawing(
            self.name,
            width=90,
            height=150,
        )
Nearly identical to the approach we did above.
Note the callback is self.execute, let’s add that to our Number class as well.
Step 2 - add execute callback #
def execute(self, *_args):
    """
    Our execution callback again
    :param _args: catching sender/data
    :return: executed command
    """
    command = c.get_value("command##input")
    exec(command)
With these changes you have the full code and on running you should see something like
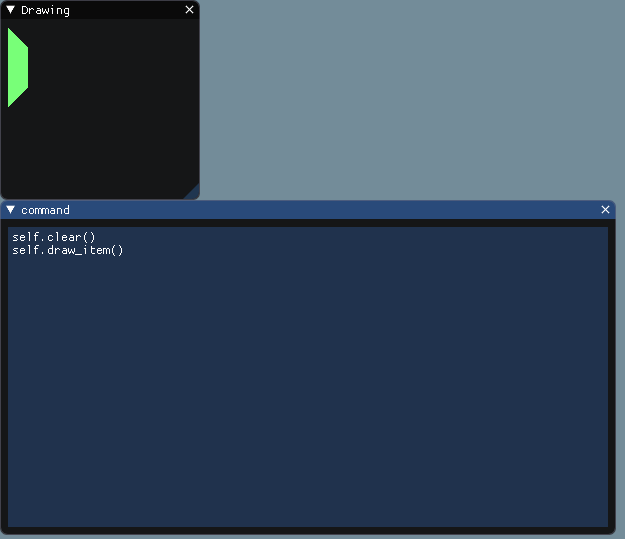
By making execute a class method, we can now directly access the self instance.
Examples: #
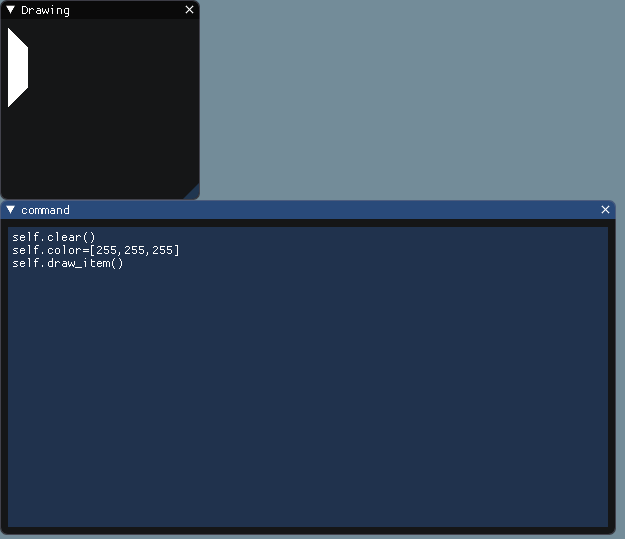
Changing render color
self.clear() # Clear canvas
self.color=[255,255,255] # update color value
self.draw_item() # draw shape
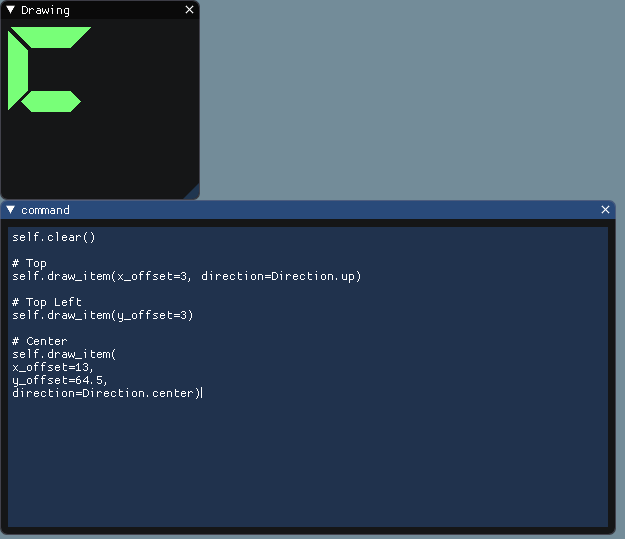
Rendering multiple lines with offsets
self.clear()

# Top
self.draw_item(x_offset=3, direction=Direction.up)

# Top Left
self.draw_item(y_offset=3)

# Center
self.draw_item(
x_offset=13,
y_offset=64.5,
direction=Direction.center)
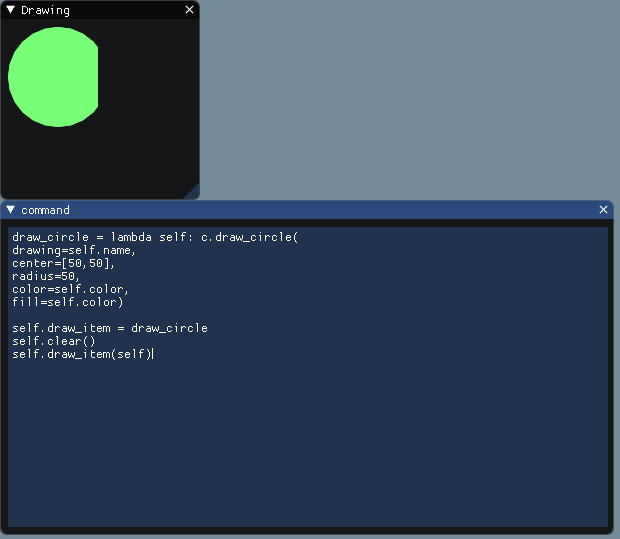
Updating a function on the fly
draw_circle = lambda self: c.draw_circle(
drawing=self.name,
center=[50,50],
radius=50,
color=self.color,
fill=self.color)

self.draw_item = draw_circle
self.clear()
self.draw_item(self)
This is tougher to do on the fly but you can define and redefine functions while you work.
Going Further #
This was super helpful for me and I used it to rough in the proper offsets for each line to make the digital display. Yes, math could have saved me but it was late and I was watching Brooklyn Nine-Nine so incrementing offsets manually while watching TV was way easier than thinking through the geometry that I’m garbage at. Don’t judge me!
Anyway, you can combo this technique with a file picker to live-load scripts into your ENV if that’s more your speed or keep expanding on this idea.
Full Code #
Annotated Code
""" Shows more complex execution usage"""
from enum import Enum

import dearpygui.core as c
import dearpygui.simple as s


class Direction(str, Enum):
    """
    An enum to indicate which of the 5 line types should be rendered
    This isn't super critical, mostly makes selecting specific values easy.
    """
    up = "up"
    down = "down"
    left = "left"
    right = "right"
    center = "center"


class Number:
    """
    Class for creating a single 'digital' number display
    """

    def __init__(self, color=None):
        self.name = "Canvas" # our drawing name
        # This sets color of polygon drawn below
        if not color:
            self.color = [120, 255, 120]
        else:
            self.color = color

    def clear(self):
        """
        Clears the canvas drawing
        """
        c.clear_drawing(self.name)

    # Feel free to skip the messy code below, this draws a polygon.
    def draw_item(
            self,
            x_offset=0,
            y_offset=0,
            direction: Direction = Direction.left,
            tag: str = None,
    ):
        """
        Creates a line in the number box in the digital clock format
        :param x_offset: x translation magnitude, as x gets larger, the line shifts right
        :param y_offset: y translation magnitude, as y increases the line shifts down
        :param direction: Which type of line to render
        :param tag: string to tag the line with
        :return: drawn polygon on self.canvas
        """
        if tag is None:
            tag = str(direction.value)
        translate = lambda coords: [coords[0] + x_offset, coords[1] + y_offset]

        if direction == Direction.left:
            position = [(0.0, 0.0), (20.0, 20.0), (20.0, 60.0), (0.0, 80.0)]
        elif direction == Direction.up:
            position = [(0.0, 0.0), (20.0, 20.0), (60.0, 20.0), (80.0, 0.0)]
        elif direction == Direction.down:
            position = [(80.0, 20.0), (60.0, 0.0), (20.0, 0.0), (0.0, 20.0)]
        elif direction == Direction.right:
            position = [(20.0, 0.0), (0.0, 20.0), (0.0, 60.0), (20.0, 80.0)]
        else:
            position = [
                (0.0, 10.0),
                (10.0, 0.0),
                (50.0, 0.0),
                (60.0, 10.0),
                (50.0, 20.0),
                (10.0, 20.0),
                (0.0, 10.0),
            ]

        c.draw_polygon(
            self.name,
            points=list(map(translate, position)),
            color=[255, 255, 255, 0],
            fill=self.color,
            tag=tag,
        )

    def execute(self, *_args):
        """
        Our execution callback again
        :param _args: catching sender/data
        :return: executed command
        """
        command = c.get_value("command##input")
        exec(command)

    def run(self):
        """
        This method defines our windows and creates our command input dev
        window.
        """

        window_args = dict(
            autosize=False,
            height=200,
            width=200,
            x_pos=0,
            y_pos=0,
        )
        with s.window("Drawing", **window_args):
            c.add_drawing(self.name, width=90, height=150, )

        with s.window("command##window", autosize=True, y_pos=200, x_pos=0):
            c.add_input_text(name="command##input", width=600, height=300, multiline=True, on_enter=True,
                             callback=self.execute)

        c.start_dearpygui()


if __name__ == '__main__':
    # We instantiate the class and launch our GUI
    num = Number()
    num.run()
Wrap-Up + Conclusion #
A bit long-winded for how simple this was, but hopefully you found it interesting and it gives you some ideas for your own work!
This is a great way to debug or directly query your application on the fly to understand what is going on.
In part 2, we will take this and create our own development kit which we can tweak and adjust to fit our own coding-style. With this we can both modularize our work and re-use it on any other project we want and we can also make it much easier to ensure that all development tools are removed from production apps so that there aren’t any vulnerabilities left open unintentionally.